New Web+Center User’s Group / Information exchange |
| A new Web+Center User’s group has been created by Internet Software Sciences and currently being moderated by Web+Center user Jason Morley from the Arthritis Foundation (www.arthritis.org).This user group has been created for Web+Center users to connect and share information, applications, customizations, tips, problems, solutions, recommendations, enhancements and other common ideas that involve the Web+Center Help Desk application sold by Internet Software Sciences.Information shared here is meant to be a free exchange and sharing of information to benefit all users of the Web+Center User Group but information posted should not be for commercial purposes. Internet Software Sciences does not control or endorse any of the articles submitted and can not take responsibility for the content of the information provided.Issues about the content should be directed to the User Group Moderator or contact Internet Software Sciences.To join and contribute or review previous entries, view the Web+Center User group web site at:http://finance.groups.yahoo.com/group/WebCenterUserGroup/To join the user group, please click on the Join This Group! blue button. | Web+Center User Group Moderator: Jason Morley Arthritis Foundation He can be reached at jmorley.arthritis.org or by phone at (404) 965-7686.  |

Lake County Sheriff’s Office – Asset Tracking with Web+Center and Pocket+Center with integrated scanners
Article by Brian Crowell
Computer Specialist – Criminal Justice Operations
Lake County Sheriff’s Office, Florida
We have been using Internet Software Science’s Web+Center in our small IT department for a little over a year and have been very pleased with the experience. This program met our criteria when we went looking for a help desk platform exactly. We needed something that was reasonably priced, browser-based, and with an Active Directory integrated login for users. The excellent technical support and customizability of the platform were added bonuses.
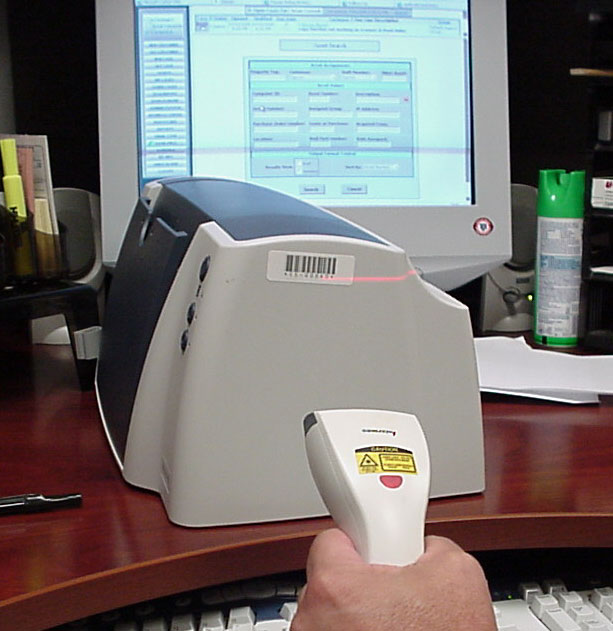
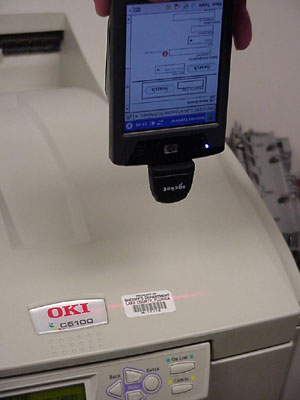
One of the features we’ve put to good use is the Assets module. This has been a major benefit to us for two main reasons. First, we are able to track the history of an asset. By tracking asset numbers with our cases, we can look at the history of calls associated with a particular asset, enabling us to identify troublesome components and take appropriate action. Second, we are able to track the location of an asset. This helps us identify unauthorized relocation or removal of equipment. We can also quickly locate which assets we have in reserve when a need for a particular asset type is identified. However, it should prove most useful to us in our annual audit. In years past, our property department used one of two methods for reconciliation. They would walk a printed list around, crossing off items as they were found. Because of no easy location tracking, this was a time- consuming process. The second method was using an old hand-held barcode scanner. However, this just scanned the barcodes into the scanner for later print-out. It couldn’t capture locations or descriptions, and if something had not been entered into their legacy database, the item had to be relocated so that information could be recorded for later manual entry.

Using Web+Center Asset Component with Desktop scanners

(1) Socket scanner for Pocket+Center used can be found on their Socket web site at:http://www.socketcom.com/product/IS5300-464.asp
(2) Printable Barcode fonts available online at: http://www.idautomation.com/fonts/free/
 |
About the Author: This article was written by Brian Crowell, a computer specialist for the Criminal Justice Operations for Lake County Sheriff’s Office , Florida. He can be reached at (352) 742-4056 or by e-mail at bc@lcso.orgIf you would like to contribute an article to future ISS Newsletters, please contact Internet Software Sciences at (650) 949-0942. |
Product Information: Evaluation License Keys Available
Does your support organization need more than the FREE (3) Tech licenses to fully implement a Web+Center IT Help Desk or Customer support system for your organization?
Most users that purchase additional tech licenses obtain a (3) month evaluation license key first for the required number of techs to fully test the software in a production mode in their own support organization. By the time most organizations purchase the software, they are typically in full production use of the software and have logged hundreds of support cases with the software.
An Evaluation License Key Request Form has been added to the web site to more request a (3) month evaluation license key. Simply fill out the on-line form and we will e-mail you an Evaluation License Key agreement form that you can print, sign and fax back.
New Customer Import Wizard
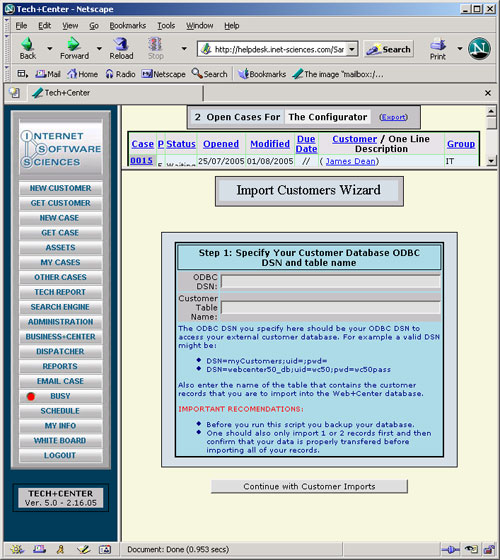
The latest downloadable version of Web+Center 5.0 now includes a Customer Import Wizard utility to more easily import customers from an external customer database to Web+Center customer database. To access this tool, log into the Tech+Center as a system configurator and press Administration.. System Configuration Menu.. Import Customer Wizard.
Once it is launched, it will ask you for you to enter an ODBC DSN that points to your external customer database and a customer table name. Press the Continue with customer import buttons.

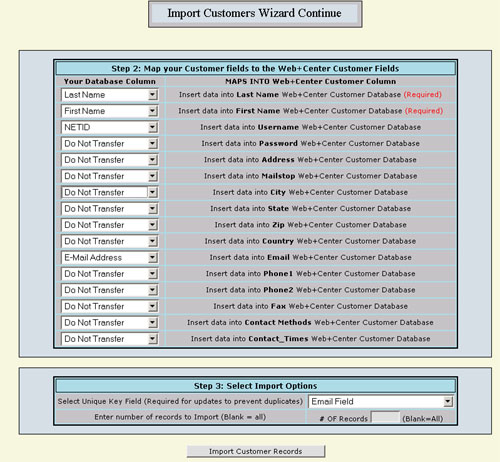
On the next screen, it will display all of the Web+Center customer columns on the right hand column and provide a drop down list of the columns of your external customer database to allow for easy mapping. Simply choose the columns of the data you want to import into the Web+Center customer database.
Additional you can choose if a particular column should be used to define unique key fields to prevent duplicates and the number of records to import.

To download this ASP modules if you are already have 5.0 system in place that does not have this utility, follow the steps listed below:
- Step 1: Connect to the Web+Center version server and obtain a list of the newest Version 5.0 Tech+Center files which are located at:
Show V5 Tech+Center Files - Step 2: Find and download the following files: Find the ASP modules and download them into your Web+Center – TechCenter directory by right mouse clicking and saving the following (4) files:
ImportCustomers.asp, DoImportCustomers.asp, DoImportCustomers2.asp, ConfigAdmin.asp - Step 3: The last file, ConfigAdmin.asp now includes this customer import tool as a clickable link on System Configuration menu page.